how to put (copy) objects and change their size progresivvely along a curve or between curves?
Hi,
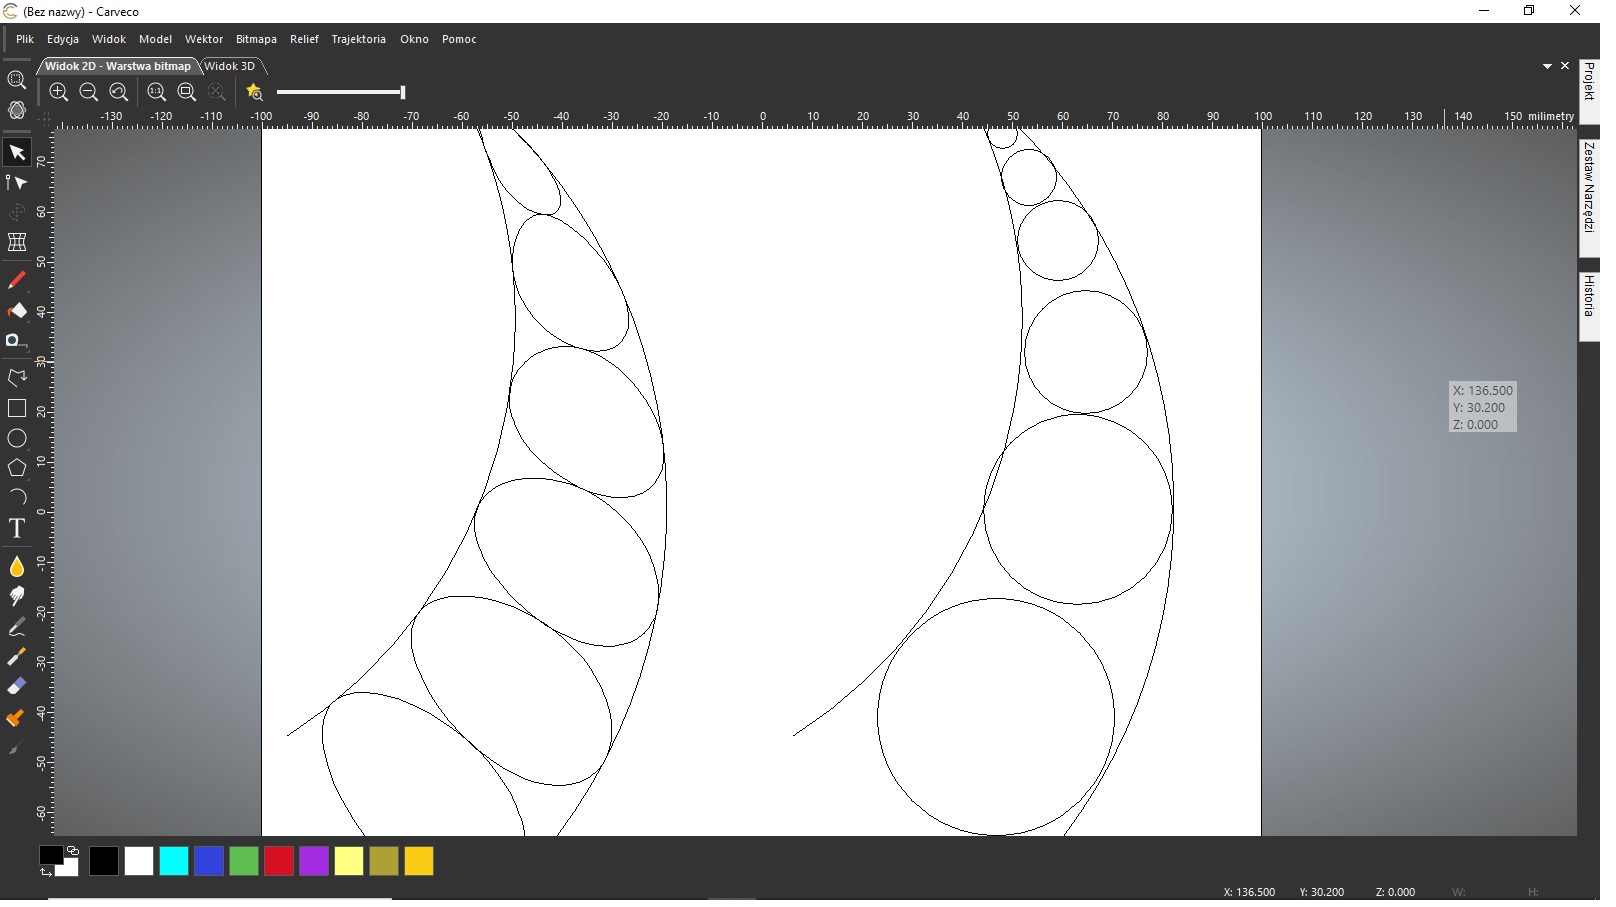
On the below picture i tried to put some circles in between two curves. The left one I've done using envelope distortion, the right I did manually.
Is it easier and faster way to put the objects with their sizes changing (not shape) along any curve? I know the resolution for circles and rectangles (convert the left one to regular shapes) but I would also appreciate some help how to do it for any objects.
Regards,
Grzegorz
Comments
Grzegorz,
You talking of clipart?
I can do that with clipart, I have the full version of carveco.
It is kind of cool the different things we can do, I'll do you a little photo in a week or so.
I hope you know about the training tutorials, here again these are really cool and are don in a very nice manor, easy to follow, understand and appreciate.
mike
A few options:
1) Vector distortion can be used with better results if you try to align your boundary vectors to the compass points. This is because the vector distortion tool is essentially a big box/rectangle and aligning it this way from the start makes changes in the envelope more predictable/controllable.
2) You can exploit the 'paste along curve' vector tool if you first create a centerline vector that runs perfectly down the center of your boundary vectors. No matter the shape, a V-Carve toolpath can be very handy to show you where the exact centerline is - create a dummy toolpath with a large v-bit and let it calculate. Then toggle on 2D toolpath line visibility and trace over it with a polyline. That polyline can then be used in conjunction with the paste along curve tool. (pic attached below - you can see the handles of my bezier curve traced over the VCarve toolpath centerline...then just delete the toolpath)
3) Try the Texture Flow tool but set it up to just fill with one row of vectors, like your design. This tool is mentioned last because it can get complex to get the settings right and will take some playing around while learning to get predictable results because it is designed to create texture...not exactly what you are doing.
Thank you, Michael and Brady.
Mike, I'm talking about any vectors but it will be great to see your solution with cliparts.
For now I still do not see a direct solution to create what I want in a fast way, but using some Brady's solutions I improved a bit the way to do it.
I'm trying Texture Flow and it gives some flexibility in changing sizes of the object I'm placing and in fact, its a challange to set it propoerly in order to get one row of objects. I create the center line in a bit different way -> I'm closing the boundary, but instead using toolpath I fill the boudary with a colour and I use "bitmap to vector" with center line in its options, what gives me a vector as a result. Some cleaning and the center line is done.
Further suggestions will be appreciated.
Grzegorz
Greg,
Can you give more detail on your overall project? I mean, is this something that you need to do 1,000 times to fill a whole sheet/sheets of material - or are you only doing a couple? Just hexagons or other shapes?
Brady,
Me and my doughter are trying to design snakes and dragons in Carveco and we are looking for the solution of how to place different patterns (which are built from predesigned objects) on the snake's skins. As we can imagine, they may be in different positions and whats more, their thickness is different in different parts of their bodies, so the objects needs to be placed with different directions and sizes. The number - let say 100 and more times to place the objects with different direction and different size.
The hexagons and their number on the picture were given just as an example but the project is a bit more complex.
I work with Carveco since its beginning, and before that some time in Artcam - as a hobby, but anyway I know some basis. I can build the patterns step by step or faster from pictures etc. but this is not satisfying us :) Texture flow, pasting along a curve, envelope distortion or nodes editing are very useful for our project but maybe I don't know the most efficient usage and some of the community know.
Grzegorz
Thanks for the added info...Since each 'scale' is going to be different, I don't think you can leverage any tool to get you where you want to be without manual placement (although it did tickle my brain to see if 'Plate Production' could be used by exploiting some of the WingDing fonts or something like that from an Excel file). I think maybe it is possible to first arrange some generic vectors in the proper position, & then use the align vector tools to center up each unique pattern and rotate accordingly.
When you mentioned snake skin, I immediately thought of this:
The signature 'Delcam/Artcam Lizard' - which demonstrates the 2 rail sweep and the Relief-Edit-Texture tool...which you *may* find helpful in this process. My thought was that the texture tool could be used to assist in distributing either one of the preset shapes OR a relief you have exported (from file option) - and then do a vector from relief - and then use those as a basis for centering up your unique 'tiles'.
So...If I were doing a project like this, I would most likely just 'bite the bullet' and remember that there's nothing new under the sun. That is to say, don't work harder than you have to - someone has probably already done the hard work of creating the 'seed' (as I call it for patterns) - including Fibonacci or nature. So you may find that doing a Google/Duck Image search for snake skin (first trying black/white/clipart/line settings before photos) - may yield something that you can either use directly or emulate. Sometimes just seeing a picture triggers your brain to think in a new way. Then use that as your pattern seed...
Hope that helps some!
Have you tried copy many of same size vectors to a line (using paste along a curve) then surround all vectors with a oval, rectangle or some kind of closed vector then used the envelope distortion tool, does a better job than just using it to distort many between 2 lines. and from reading what you are doing is this or the size difference going to matter much? It does but in wood unless the size is large enough it doesn't, right?
the use of the envelope distortion tool is frustrating at best sometime because it distorts the vectors weirdly, like the circles become ovals when you need circles it changes stuff where you begin to say naughty words then you go back an redo stuff manually even though you don't have the time.
mike
mike
Mike,
The solution you suggest works if there is one direction of vector curve and the angle of change the curves's diretion is no more than 90 degrees, otherwise envelope distortion will not help. Unfortunately snakes shape often look like meandres or some periods of sina wave and this causes problems, - the only solution is to divide the whole shape and do changes piece by piece.
grzegorz
I am trying to learn Maker. I need to put text around a circle. I have watched the training video on this topic many times but it seems like I dont have the option to "fit to curve". What am I missing??
Hi Frank,
If you do have the Tool Settings: Text Tool panel displayed, but its On a Curve settings are hidden, then you have selected either the Method list's Limit by Box or Scale by Box option within the Constraints settings, When wrapping vector text on a curve, you must ensure the Method list's None option is selected within the Constraints settings.
Please watch the following demonstration videos included in our Carveco Fundamentals training course:
In future, please create a new post rather than commenting on an existing post.
Thanks for your time and consideration.
Please sign in to leave a comment.