Changing what is engraved
I've attached the picture I am working with. I converted it to a vector file. When I run the program the CNC carves out the blue areas to the depth I wanted and the white is level with the surface. What I want to do is reverse the v-carve to carve the white parts deep and the blue even with the top. Is this possible and if so how?
Thanks
Comments
Doug,
What do your vectors (lines) look like?
Are you using "Maker", "Maker Plus" or the Pro?
Will help me format an answer so you can follow through.
Mike
Hi Doug,
When you select the vectors for your toolpath, try selecting everything but exclude the outer circle. This way you will get only the white parts carved.
Hope this helps.
Elina.
Elina,
Thanks this is the reason why I asked him for what his vectors looked like, he also might have a border on the outside of his model area I usually do but it's on another layer.
mike
True Mike, there is usually an outside border. Since the blue areas are carved though, I assumed Doug already got rid of it.. or maybe not!
Doug, let us know if you are still facing issues. A screenshots of your vectors will also be helpful.
Elina.
I just used create vectors with the bitmap.
Im using maker.
This is only the 2nd thing I have done with the cnc. The first was a juice groove. So I'm very new to all of this.
Hi Doug, thanks for sharing this. Same as before, just select everything except the outer circle. This way the toolpath will be applied only to the 'white areas'. Try it out and let us know if it worked as you wanted.
If you still need an outer circle as shown in the first image you posted, then you might need to make an offset (or just draw a new outer circle). In that case, select everything and set your toolpath.
Hope that helps!
Elina.
Thanks I’ll do that.
Which bit would you recommend. I’ve used the 20, 60 and 90 degree bit.
I appreciate the help.
Doug,
20 is way to sharp for wood, by the time you cut it it'd probable go an inch down, 60 isn't too bad it gives good sharp detail, the 90 (45 V bit) would be good too, it all depends on how thick the wood you are using would be, plus it all boils down to what you like, try the 60 and 90 see how it looks.
Would you like this all raised? Might be fun to do.
mike
This what I've done in a few hours, I could put it here for you, just have to remember all the stuff I have to do to do it. You could try the v-grove on everything else but this.
mike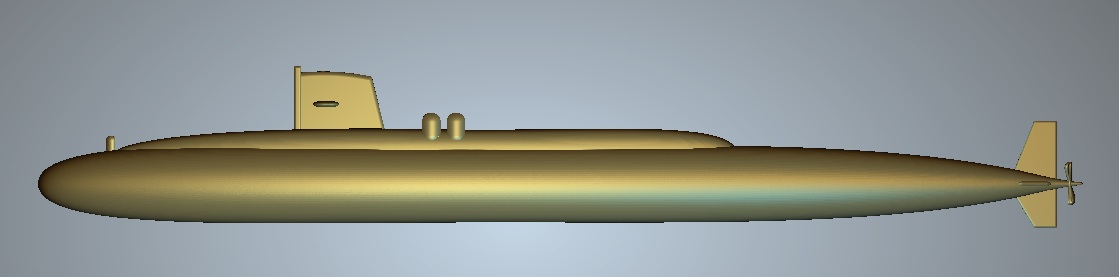
Doug,
I got to play again tonight, the only thing that's not here is the eagle top center.
let me know. the thing is 12 inches square about .400 high but the letters they are .200 the surround is .25"
mike
This is beautiful. It would be great to get this. I want to put it on a plaque so can I resize it? Thank you. I plan on putting this on two plaques for two friends that served with me on this sub in 1975. We met up again for the first time in 2016 and have been close friends ever since.
Thank you so much.
If you could tell me how you did this that would be great too. I’m trying to teach myself and I bit of more than I can chew for a 2nd project
Thanks again
I can send you the file, or rather put it here.
I have been using the pro for over 20 years, take great joy in modeling things.
The Pro has tools the lower end ones do not, this is why I said I'd send them to you, actually put a link from a company that allows us to use their services.
Here's a screen shot of it with v-grooving the letters and the surround, still haven't done the eagle (my-bad) Before I send anything I'll make sure every things done.
Close quarters bring great friendships, always great to hear. Everyone that I serve with isn't around any more that I know of.
If you let me know what control your cnc (what you save your out put like) uses I'll run those too so you can run it and see how everything turns out
mike
Doug,
Let me know the size of material x and y plus the thickness of it in .100's, in the late 70's I was a machinist so I was schooled not in metrics but standard measurements.
mike
You asked how I did this,
I'll see if I can walk you through the steps, in the Pro we have a lot of cool tools to help accomplish our goals and desires, we have the shape editor, the cookiecutter, the transform vector tool that also works in the cookiecutter, the contour blend tool (for getting shapes that the shape editor will not give) vector tools so we can draw lines around specific areas in getting what we are after. (I think I've covered all what I used)
To get the hull shape I drew lines around a different picture of the sub I used the polyline tool then used the node editing to get the curves.Once I got the main hull shape I made an oval used node editing again to remove the lower section, for the shape of the hull it followed the polylines with this shape adjusting height as it went to get the shape.
The second part of the hull shape (the top part) used the poly line again made 2 lines on curved one straight ( you should be able to see it in the full pic of the vectors) again I made an oval used the node editing to get the shape I was after (by the way everything on it's own layer after all was said and done the relief layers were merged high) I used the 2 rail sweep again making sure I got the flat spot in the right spot.
For the ailerons, the pier (don't know the name but this does it for me) and the rudder I used the shape editor with a restriction of height with the round, for appearance. Shoot for got about the stacks and the other 2, I think I used the shape editor also.
Now for pics, hope this helps (I hope I covered everything) the first three pics are of the new pic of the sub, the 2d view after I got rid of some background so I could model it, and one of the 2d view of the pic to model.
mike
Forgot the pic of the vectors. And forgot about the prop, I used the 2 rail sweep but in order to get a close rendition of the shape had to do a lot of thinking, I used the 2 rail sweep 2 times used the cookiecuter with the transform tool to change it a little, did a few other things that have escaped me
mike
I'm using a genmitsu 4040-pro using the sainsmart file *.tap. Thanks so much. My friends will love it.
Did you teach yourself or did you do some on-line course?
Thanks again
Doug
Doug,
When I purchased Artcam, the only videos out there were from Delcam and the only ones they had were from the yearly user meeting I'd watch and rewatch over and over about 1,000 times then I'd try what they were saying. To say I struggled is putting it mildly, what's so funny is I didn't even know what a vector was (just lines, hahahahaha) I could not afford to go to the users meetings had 4 kids and they were $$$$$. as the kids turned teenagers they started to eat me out of the house, I'd come home each night and work 6 or more hours on the computer, even after 2/4 years but it got better, now I just look at the video that Carvco has only for verification so I can help someone then point it out for them to view, since these people have gotten the source code of Artcam they have some wonderful videos, I absolutely recommend them, they will help greatly.
The last time I had any apprenticeship was in the 70's and 80's, there was no training that I knew of. I probably got the better end of the stick as far as learning, poverty is a great motivator.
mike
ps. The eagle would you just want a some what eagle shape or one that's the full shape? if its the full shape it'll take me another week or so to get it right.
I've been cherry pickin the videos to help me with what I want to do. I need to start at the beginning and go through them. At my age I'm doing this for fun. I can usually only work on anything during certain months. I moved to Florida. All my woodworking equipment is stored in my garage. Here there is about 5 months where it is unbearable to work in the garage.
I love it without the eagle.
Thanks so much for your help.
Doug
Okay, been rather busy these last few days, I went and modeled an eagle (well really I used carveco's ai then did a few things to it to get it right).
If you are wanting this with out everything raised (in other words "you will want to v-grove the letters and the surround but you'll want the sub raised" I'm hoping I understand it. Here's 2 pics for you with the eagle. The height of the sub is .300 with both, the eagle I think is .150", I changed the size to 8 inches square. If you'd like find some how to pm me and give me your address I will send both to you so you can resize them to the material you'll be using, If you want me to provide the tool paths then please give me the material size you'll be using. If you want just the raised I can send that, it's been a few years since I sent any with both raised and v-grove so I might have lost the knowledge.
mike
Thanks they are beautiful. I would like both and the toolpaths. I’ll look into how to pm. I also don’t use forums like this. Is it not acceptable or good practice to post your email?
Thanks again
Doug
https://we.tl/t-s8YR3Y9XfR
Doug
Here's the file all raised, you'll have 3 days to get it.
I don't know how to do the PMs, It's been done to me, I went looking for a link, but like looking for my tapes can never find them when I need them, I'd need to send you these things on a usb with all the things together, I don't have maker install so I don't know how everything works with it until I play with it,
Check out the file let me know, It's 9b9 .300" high
mike
Doug,
I'll send the toolpaths also if I can get the size of material you will be cutting, They will be zeroed at the top so have another piece of material the same thickness so you can zero out the "Z" off of that, this my preferred way when working with different sized wood, the nasty stuff can very about .030" so I always get a nice result.
mike
Doug,
I put the file up here, I asked support if there was a PM on the forum, was told no, he suggested I try Facebook, I'm not on facebook so I'm stuck I used we transfer put the file up a couple days ago, let me know if you got it yet, if not I'll do it again, the trouble is you have just 3 days to get it.
mike
Thanks. I downloaded it but haven't had a chance to work with it yet. I've showed your work to a couple of friends and they loved it.
Thanks again and I'll let you know how it turns out. Besides we both know I'll need more advice.
Thanks
Doug
Doug,
Awesome, some pointers for you, this model with the words would be best to be cut out in a chunk of wood at least 7 to 10 inches square or more, this way you can get the letters cut well enough so the bits would be able to distinguish them all the way down to the base.
One more thing I can provide the art file that doesn't have everything raised (v-bit grove for the letters) through the same way that you could put it on any size you want but I could not give you the toolpath for your router unless you'd give me the size of material you'd want it cut out of, the toolpaths would have to be recalculated for each size of wood. I suppose you could zero out the v-bit from the material that's been cut (I've never done that) like I said the pro has quite a bit more benefits than the other software.
mike
I’m going to use just go a square 10X10in plaque 3/4 inch deep.
Personally I set the Z 0 at the center because it has been easier for me to locate it on the base.
Hope that helps. Sorry it took so long to get back to you.
I will keep looking for a way to pm. Maybe Google Drive?
Thanks
Doug
The only way to PM you would be for both of us to be on the same system. I'm on Reddit and Facebook. I can also give you an old email address.
Let me know
Doug
Doug,
Sorry about the length of time for me to respond, I got a new computer and it was a real pain to get everything setup, took over a month to get set, I was set back in what I needed to get done I'm almost setup and running correctly and almost caught up so now I can respond to you.
First I'm not on Facebook nor am I on Reddit, I did get on LinkedIn but they had a hack and my info got out and it sort of ticked me off (they never told me) so I try to keep off all such forms.
Have you milled out the sub yet?
mike
Yes. I did. I can’t figure out how to attach photos or I would send them.
I haven’t done much. I have 3 pinched nerves and can’t stand or walk.
I think I may have bit off more than I was ready for as a newbie with this as my first project. I’ve gone back to the tutorials.
Thanks Doug
Please sign in to leave a comment.