Answered
Surfacing multiple project boards.
I have multiple pieces of hard maple ranging from 1.1 to 1.375 inches thick. I’m trying to surface each of them to 1” before I cut my trays.
Question: How do I set up this tool path to z-zero from the surface of my waste board and run an area clearance? I’m trying to avoid having to use calipers and deduct from the surface to achieve 1inch every time.
The tool path is currently set to remove .125 from the surface of my board. But then when I swap to a new board, I’m going to have to re measure and set up new tool paths. I’m trying to avoid this.
Thank you for your time and support.
Comments
Hello Beau James,
I'm not a 100% this is the solution.. but have you tried setting your material with Bottom Offset for Z Zero?
Maybe that'd help.. Let me know if that works as I'm also curious! Thanks.
Best,
Elina.
I have not physically attempted that. But I believe it would work providing I make the material thickness slightly above the thickest piece that I have. I would lose some efficiently for the boards that were thinner because I would be carving air for a pass or two. But as of now this is the only solution. Thank you.
I have the exact same situation and posted it, referencing your post here, on Carveco Facebook group. I received feedback but it did not work for me. Were you successful in your attempt? If so, could you post exactly what you did? I am surprised that I didn't get a solution on the Facebook group. I have searched and searched, and your question was the only thing that came up. As powerful as Carveco Maker is it seems that to accomplish what we are trying to do would be a simple procedure.
Best regards,
Lamar
Lamar, no official resolution at this time. I’ve been wrapped up with other things lately. But I’ll be reaching out to CarveCo direct if I can’t figure it out after my next batch of surfacing.
Thank you for replying. :) I am very new to the world of CNC and too old to be venturing into waters above my head. I am going to give something a try, if I succeed, I will post it.
Thanks, Lamar. Same here. Best wishes.
Ok let’s see if I can explain what I did to accomplish what the both of us are trying to do. First of all, I am using Carveco Maker. I started Maker and selected new model, set the size of the test piece of material that I was using, 10”x8” (it was 3/4" MDF and wanted it to end up 1/2"), set job origin bottom left corner click OK. Clicked on “Create Rectangle” in left column came over to top left corner of project and while holding left mouse button down drag it down to the bottom right corner and click “create”. Select “tool path”, area clearance and in dialog box I set “Finish depth” to 0.5 (this would be set to whatever depth you want the project to end up) and “Tolerance” 0.001. Selected the 1/4" down cut bit, Stepover 0.1, Stepdown 0.2, Feed rate 180 in/min, I set the Plunge low 50” in/min. I have a Maketa router on my CNC so I set it at 16500 rpm, Raster, set the Machine Safe Z to 1”. In the “Material Setup” I made the material thickness 1", make sure the blue dot on the left is at the bottom and when you probe do it at the spoilboard not the top of the work piece and O x and O y at bottom left corner. I think this is all that I did. If you try it let me know if it works for you. Tomorrow I’m going to try it on one of my real pieces that I want to flatten. I know that this probably confusing because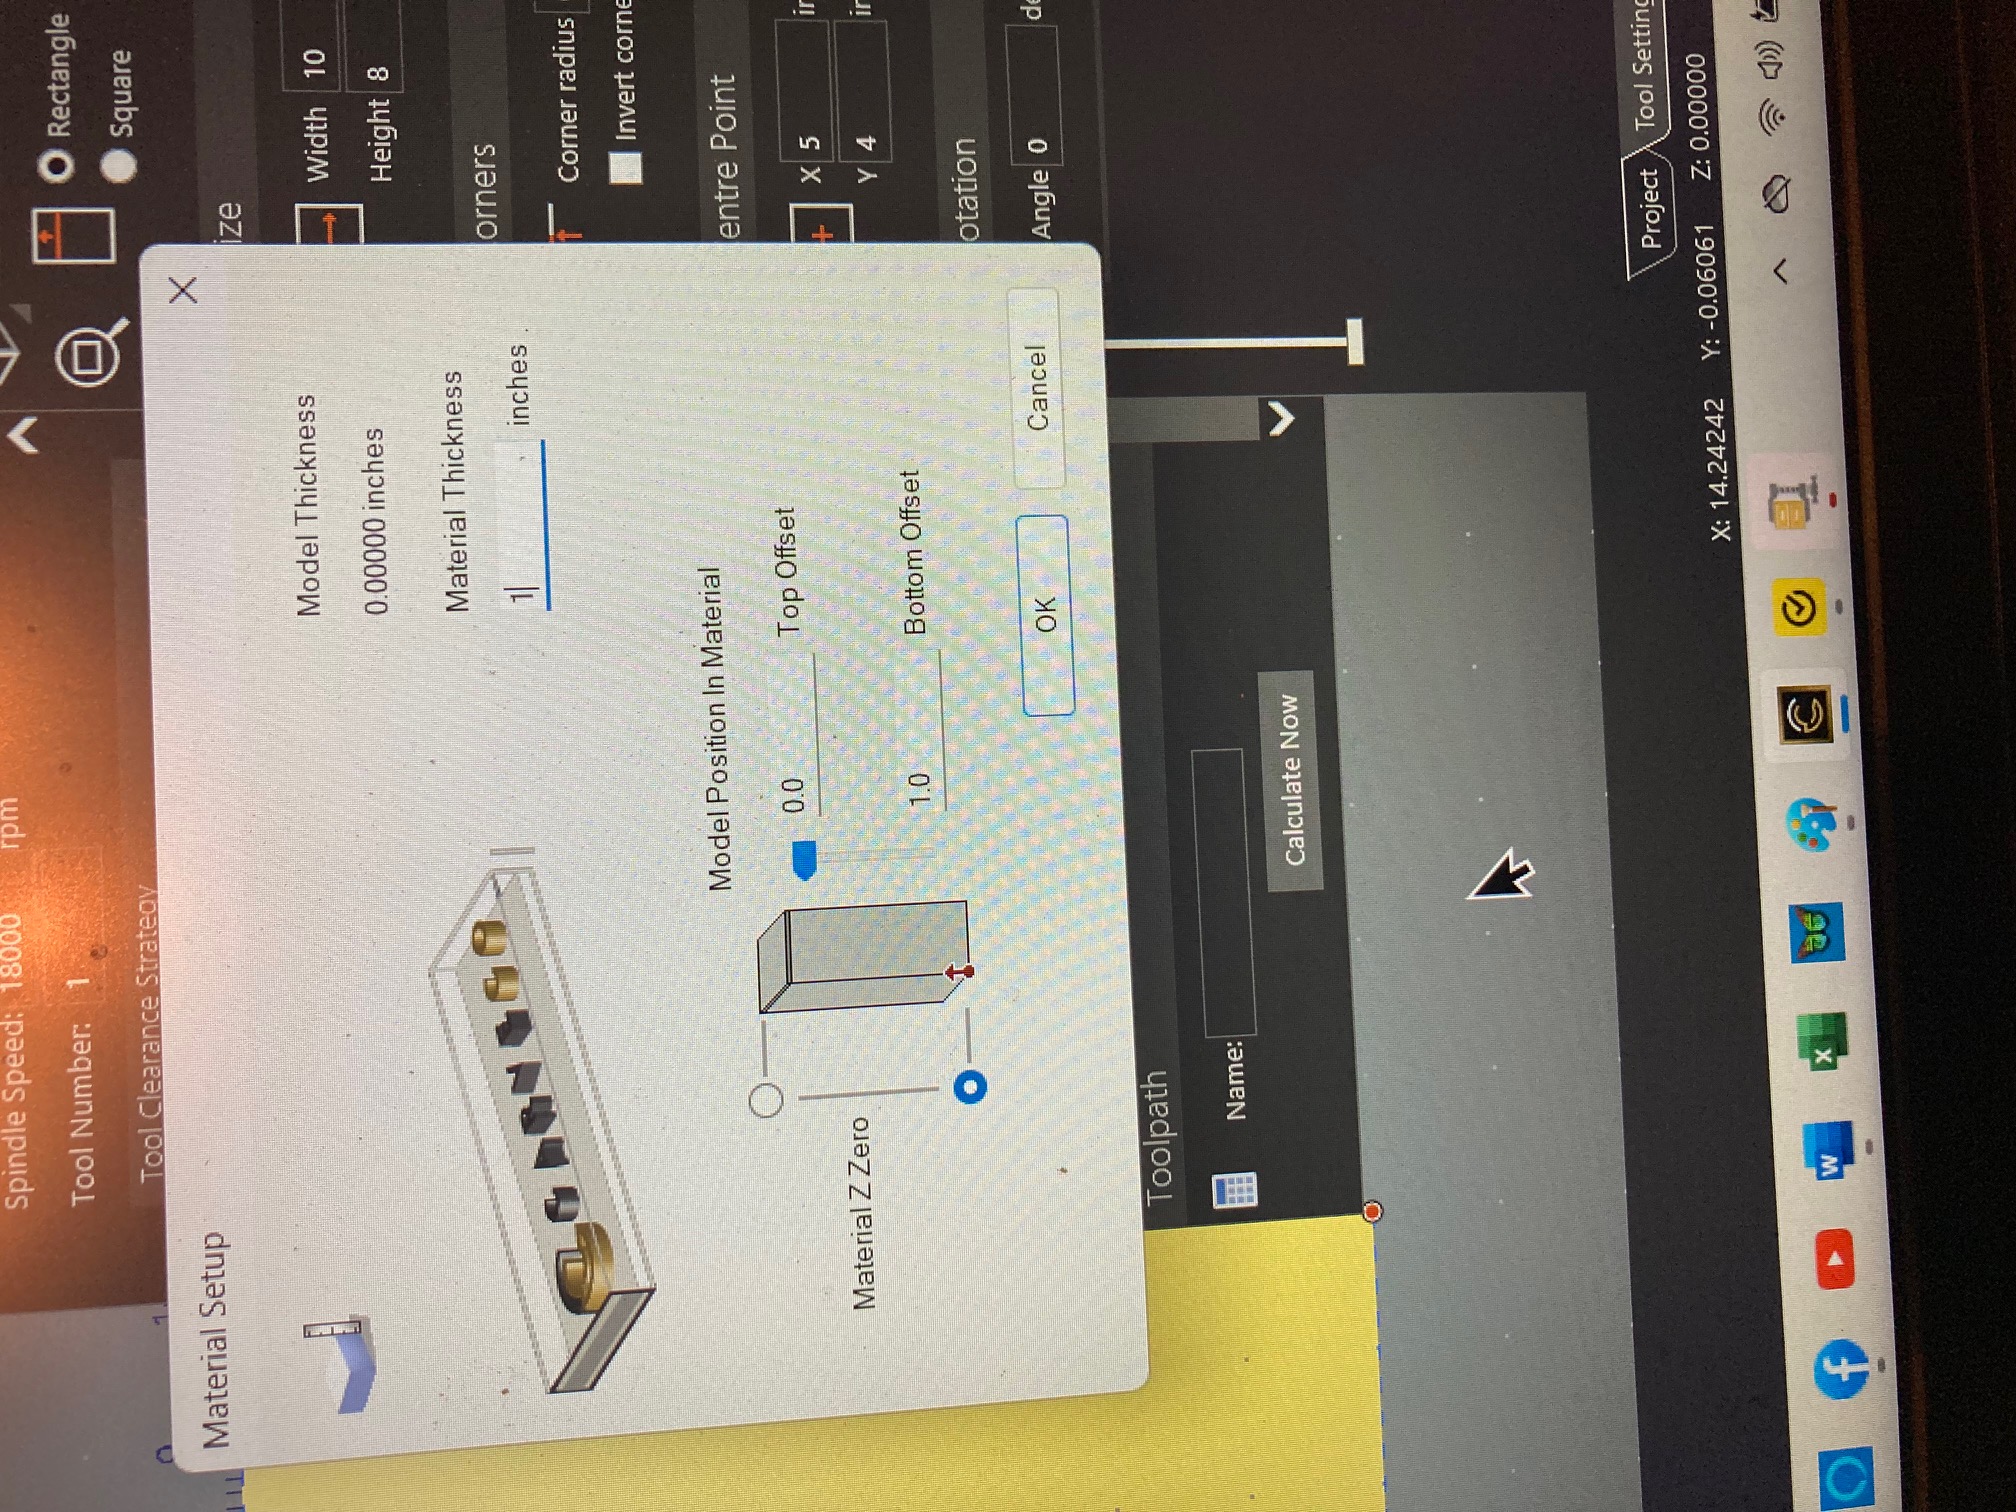 my eyes are crossed just trying to type it.
I think that’s the ticket. Probe from the waste board and not the material surface. This was you ALWAYS finish at .5” as opposed to probing z on the top of the Material where it would take .5 off where ever you probed from. Let me know how it goes. Specifically interested in the same tool path with two or more pieces of various thickness all milled to .5.
I did my good material, and they all came out to be exactly the same. I may have to play around with the setting a little because they finished .73” instead of .75”. I thought that I attached a question and answer that is in "Carveco Help Center" concerning pretty much what we are trying to do, called Cutting new material to a specific thickness. This is the link if it works. Cutting new material to a specific thickness – Carveco Help Centre.
Thanks for taking this on and sharing the end results! If you are unaware, I’m in a maker community called “CNC with Me” which was created by @Hamilton Dilbeck who I follow on YouTube as well. Up to almost 700 members of like minded makers who are sharing, collaborating, connecting and most of all helping eachother through the CNC journey. Hope to see you there!
You are quite welcome. I to joined CNC With Me back in early Jan '24 after I got my Onefinity Journeyman. Hamilton lives about 40 miles from me, and I have thought about maybe asking if I could drop by his place. I registered as Paul Streetman on the forum, and I live in Smyrna, Ga.
Please sign in to leave a comment.