Answered
Unwanted cuts on -X side of relief objects?
Context: Onefinity Woodworker X50, Makita Router. Roughing with Whiteside 1/8" downcut (RD1600), detail with Whiteside 30 degree pencil tip (SC70). Carveco Maker
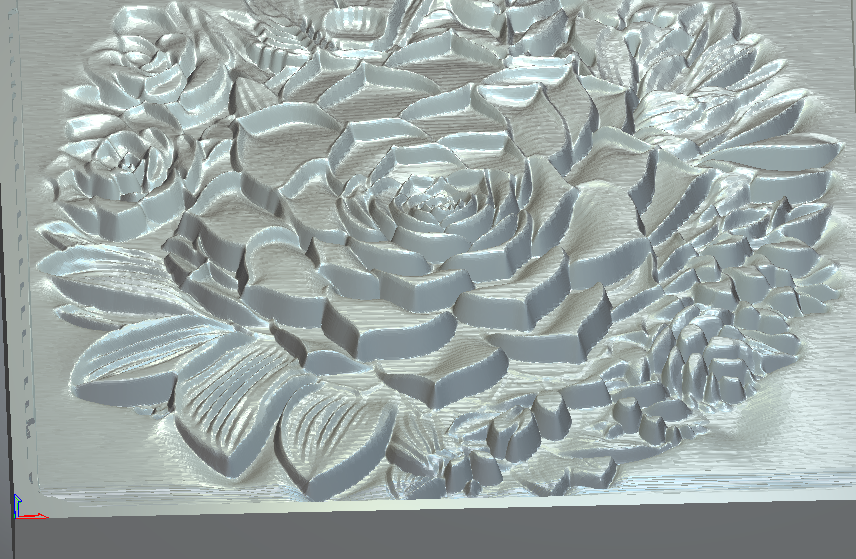
This has happened a few times now, but is stumping me on what I'm seeing or dealing with to know what direction to go with resolving. There is "extra" cuts on the negative X side of objects, cutting too far in the positive X direction.
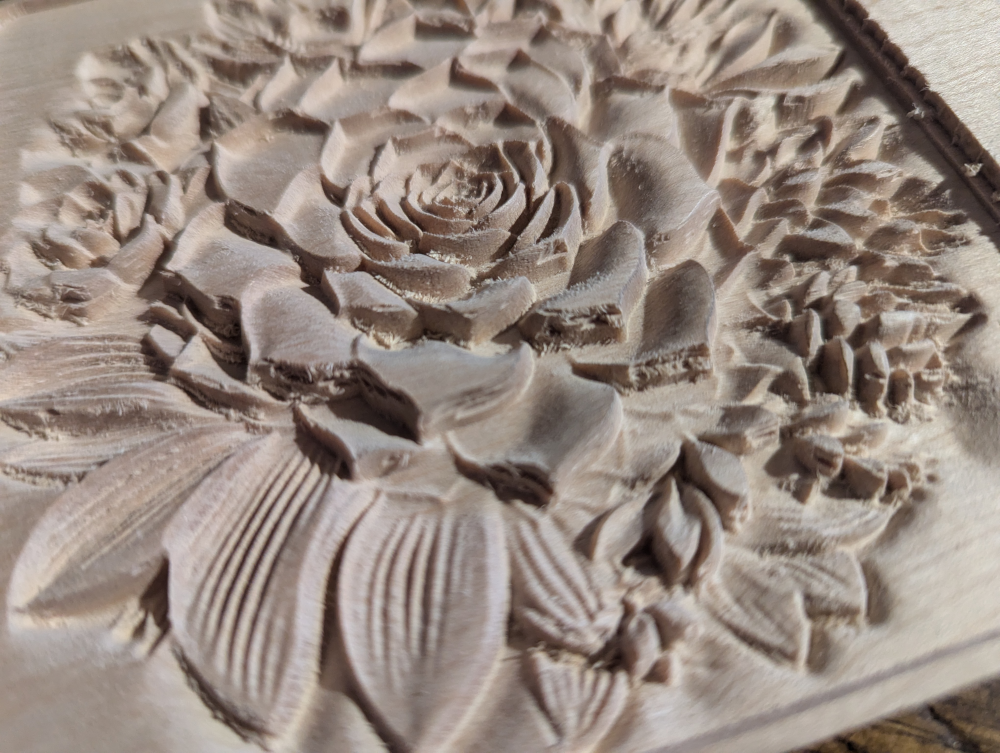
The excess or stray roughing cuts on the sides are accurately in the simulation, but not these cuts.
Comments
Mike,
You doing a relief cut inside of vector? or Whole relief? Did you make the relief yourself or did you purchase it?
If you purchased it, when you brought it into Carveco did you use the shape editor and click on the vector without adding anything used Merged High, if the file you purchased had some parts below the "Z" this will bring up the "Z" pane to zero to the vector, trouble is it might destroy some areas that are below "Z". It looks like the flower has some areas out side of the vector below the "Z". If I had the file that's what I would do. Pretty flower though. You can verify any file this way if any part is below "Z" just draw a larger box around it hit F12 bring up shape editor hit merge high to verify, if you want all parts of the file hit the undo then with the vector outline of the file hit the F12 and use add, maybe like .01, or .02 (not metric, inch) bring that baby up until you do not loose detail.
Mike
I forgot you can verify if the file has anything below "Z" by looking in the 3d plane then go to the front view. This will show you real quick if you have any part of the file below
Mike,
I really screwed up, I did not realize that Maker didn't have the Shape Editor. I'm really sorry about that.
I went and watched a video that Leighton (might have the spelling of his name wrong (sorry) the video was Create Stacked Text (cool video) in the video he described how to basically do what I was describing raising up your relief. Don't know if you'll want to go through all the steps, but very clear, if you have already tried to cut out the flower measure how deep the ball nose goes just outside the flower then do an area clear to hog away everything but the flower area the do a relief toolpath, might work, since I don't have the flower I can't do everything you need to see if it'll work.
Again, sorry for giving you bad advice.
mike
My apologies on the delay responding. Your responses don't appear to be addressing or recognizing the flaws I am referring to. I have added notation to the original image to highlight what I am talking about. Are we talking about the same thing here? All of the issues I am seeing are near the top of the relief, vertically. Not the depths.
To specifically respond to your questions:
It is a relief cut inside a vector.
It is from a picture of mine, not purchased. Relief -> Import. Then smoothed, flattened, played around with toolpaths a bunch.
Technically everything is "below Z=0". Everything has a negative Z cut value, some further than the rest. Although the placement within the material is 0.02" from the top, and extends .15" into the material. Which is 0.8" thick.
I am content with how it cleared outside the flower, and even the depth of the cuts around the petals.
I am not content with what looks like a hack job by hand tools on one side of the petals, all of which are on the negative Y side. (I erroneously mentioned X in the original post. I mean Y).
I would call it machine slop or a rail stalling out and losing it's position, except I have seen that happen before, and it shifts everything from that point on. Not just some bits here and there. I also was roughing with an 1/8" downcut, then carving with a 30 degree pencil tip. How did I get slices into the side, without material cleared above it?
Actually, typing that... when roughing, it was creating these long thin curled pieces and it traversed the wood. Sometimes they didn't get sliced completely off. I wonder if at these points, one of those would get wrapped around the engraving bit momentarily, enough to spin and slice into the wood like that, before getting ripped off. That might make sense.
Does this happen with an up-cut spiral? That's what I use unless I'm cutting plywood. By the way sorry about not noticing what the problem was, sometimes I can be a little thick.
If an up-cut does the same then I'd try a different machining strategy, like a different angle (you can change that anytime) or different machine relief toolpath, there are a few like "Raster (what you are using), raster x and y, raster classic, spiral, spiral in a box.
I have been using (maybe I shouldn't) an larger ball-end then a smaller one to cleanup and make everything nice (two different raster finish), for the smaller one I'd thicken my touchpad in the control software so it would cut about .025" lower. I do burn through a few ball-end though (they look nasty after about 30 to 50 reliefs where as end-mills I could possibility hog through about double that, the nice thing it also cuts my machine time to about 1/2 of the end-mill time. Oh, there are no roughing toolpaths
Try what I said, I'd be interested to know if what I suggested works for you.
If it does the same thing you might have a loose bolt, or a loose wire (at some area it might be zapping something), or some hold down might be screwy (you are using more than one hold down, right?), but I don't think that's the case here.
One more question how close to the reliefs finish does your roughing toolpath get? I don't think that would be the problem though.
Are you using a spindle or an under powered router or a larger one?
mike
mike
Makita router, but running 0.0015" step over, 0.1 step down, but the roughing only leaves 0.05 allowance to remove. It really doesn't feel underpowered.
I don't have a 1/8 upcut, but I can see why that would make a difference.
I'm now leaning toward those strings of wood left getting ripped off by the engraving bit, causing the lateral tearout. It is the right angle for it, and would make sense why it appears only on the nearly vertical surfaces. So removing those cleanly is important. Also explains the lack of these artifacts for the shallow .1" reliefs I have done that I don't use a roughing pass at all.
I can't rerun this for a few more days. I'm in production runs with my puzzles and can't let a carve tie up the machine right now. I'm planning on adjusting the roughing path, thinking of adding a profile pass on the rougher to snip off all the "strings". And if that doesn't work, playing with step over. If that doesn't work, using a different bit as you say.
Thanks for being a sounding board!
What kind of vibration does that thing have.
Try what I did because that .02 ball is kind of small and would flex like mad.
Try running 2 or 3 different finish passes one with the 1/8 inch and try a 1/16 inch ball-end see how that turns out then try that .02.
If your running a roughing toolpath that is going to leave a bit to remove with the smaller bit, if you were to run a 1/8 ball finish then a 1/16 ball finish your not taking off much with that last one but in the corners even then it isn't that much.
Try to look at the run time you will see it isn't that much more if not less. You don't have to run a roughing toolpath. just saying so give er a shot
mike
Okay I just looked that SC70 up never mind it will not have that much flex if any at all, I have a few taped balls and those baby's flex don't like using them unless I want some real detail. Like I did on this one a year or so ago, the lady liked it but wanted more detail so I got the tapered balls
mike
Yeah, I've got a 1/8 tapered ball, but most of my reliefs are about 4in x 4in, so the 1/8 isn't fine enough for the detail. Pencil tip is slow, but typically good results.
Please sign in to leave a comment.